Hobbit House : Return to Middle Earth How to build (With videos) Part 2 of 4
Part 2 : Digging a foundation


The foundation is dug roughly a foot and a half in the ground keep your dig uniform and make sure that your trenches are solid so your floor does not give way.
Remember that pain in the ass math from earlier ?
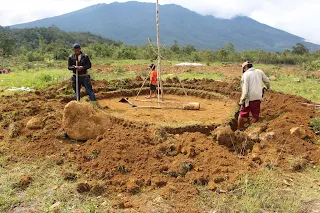
Well now that we are figuring diameter and circumference you will need that math and as you can see from the picture below that we used a wooden stick as a demarcation for the middle and a string to in essence draw out the circle and figure out the area and thus the number of bags we would need.
Ensure your circle is plotted as best as possible.
Try using a string to the wood in the middle of your area from the math you did earlier this should keep you on track and not fail you so long as you did your math and plotting right and also removed any obstacles and smoothed out your foundation.
Make sure you plan areas for your support walls and your drainage this is something I alluded to earlier.
All of this will be imperative later on when we get to the real construction in part 3.

So now that we have cleared any obstructions and smoothed out the shape of the foundation to be geometrically correct as well as having any imperfections in your circle where your floor is to be filled and sturdy to preclude problems later.
Laying the gravel :
So after this basically you will add the metal screen and gravel and small rocks best to use contrasting grades in the foundation and drainage areas to promote water flow and not retention .
Drainage ditch :
So using the idea of following the path of least resistance see where your water would naturally flow and follow it.
This is where strategic placement of your house can make or break you because if you are in a flood prone area this is the difference between being high and dry or going for a swim.
Best to use a carpet of some type to prevent silt or earthy deposits from clogging your drain or impeding flow of water doing this step wrong can be disastrous.
Support walls :
It makes sense for your dome to have support walls to lean into the structure to support your dome and door structure and also where you can see that you would have the need for that structural support.
These are all dug with the foundation and drainage so as you can see the the layout as a whole before you start putting bags or even gravel and screen and can tell with fair estimation how practical the design is or isn't .

As you can see in the videos and pictures ahead the walls leaning into the front of our structure are our support .
If you look at the circle above where it veers off on the right is the drainage and the segue adjacent on the left is the formation of the support wall.
Also the gravel and carpet still applies as you will want to foster good water flow in and around these areas as they are crucial to the integrity of your dome.
It will be easier to see with the progression of the structure in this article series.
Earth consistency for bag mixture/ The drop test :
Here is where we try to figure how we will go about creating a suitable mixture to fill the bags themselves with.
Pure clay is a bad idea and all soil consistencies will be different everywhere but I will show you the drop test that we used.
Basically do not use topsoil as the debris will decompose eventually.
Lime hardens decently so it is a fair choice also the mixture will really depend on what you have.
Some examples include 70 percent sand to 30 percent clay also a 10 percent moisture would help compress your materials and harden them.
Using too much silt could be an issue as it would weaken your structure overall.

Basically we are making sure the soil can maintain it's shape when dropped from shoulder level .
If not then it is not suitable for usage as a bag filler.
The mixture itself will come with a certain mix of your soil so long as it is not pure clay and will be mixed with coarse sand to get the desired result.
Filling the bags themselves.

We had made a make shift stand from wooden planks laying around to basically put this in its place and make the filling of the bags easier.
The bags are typically 50 pound sacks of polypropylene or burlap.
Burlap is not as durable as Polypropylene but is more natural.
Generally the weaker the fill material the stronger the bag should be.
We would fill them with the mixture to a level where we could just tuck the excess over and put them in a row format, Pretty straightforward process.
We lay them in alternating pattern much like bricks would be laid out but we will get to that later.
In part three we will finally get to the build of the whole thing and show the process as it moves .
Things start moving and the dome will take shape also we will examine air intakes and windows and doors and how and where those are best placed.


Comments
Post a Comment